Sunday, 17 November 2019

Tarragon Ice Cream

Tarragon Ice Cream

What does a wise girl do when she has leftover tarragon?

She makes ice cream, of course 🙂

After using a couple of tablespoons to make omelette aux fines herbes, I had a bunch left in the fridge, starting to wilt but still fragrant and looking fresh enough to be used. I could have left it there to die as I have carelessly done in the past with other herbs, completely forgetting they were there. But this one was uber present every time I opened the fridge, offering me a heady whiff, screaming for attention, screaming ice cream!

Tarragon Ice Cream Recipe

4 to 6 servings

2 cups half and half
1 cup whipping cream
Small bunch tarragon (about 10 sprigs)
1/4 cup agave syrup
Juice of a half lemon (optional)

Heat the half and half, cream, tarragon and agave syrup in a saucepan over medium heat until right before boiling, about 5 minutes. Remove from heat and let cool. Discard the tarragon.
Transfer the mixture to a lidded container and refrigerate overnight.

Place the mixture in the ice cream machine and add the lemon juice. Churn it according to the manufacturer’s instructions. Freeze until set.

Tarragon Ice Cream
With a husband who doesn’t eat green peppers and a daughter who doesn’t eat anything
Tarragon Ice Cream
Mellahs are Jewish quarters located in the old, walled part of most major Moroccan cities.
Tarragon Ice Cream
Looking for an excuse to make chocolate truffles? Here is a couple. 1. Chocolate fixes

The post Tarragon Ice Cream appeared first on Dinners and Dreams.


source https://www.dinnersanddreams.net/tarragon-ice-cream/

Saturday, 16 November 2019

Tchoutchouka: Moroccan Roasted Pepper and Tomato Salad

Tchoutchouka: Moroccan Roasted Pepper and Tomato Salad

With a husband who doesn’t eat green peppers and a daughter who doesn’t eat anything green (with the exception of green candy, of course) I had the entire tchoutchouka to myself. Talk about excitement. I would love for them to include the joy of green peppers in their life but I must admit that, secretly, I was happy I had no competition. Next time, I will be less selfish and make it with red peppers so they, too, can experience the wonders of this marvelous dish.

Tchouktchouka is as traditional a Moroccan dish as traditional can get. I kept the recipe authentic and unchanged in honor of generations and generations of cooks who made it the same way in every big town, a small hamlet, and a nameless village on the map of Morocco.

Dip your bread in it, serve it as a side dish, sandwich spread or Moroccan-style bruschetta on crusty whole-grain bread. It is guaranteed delicious any way you choose to eat it and well worth a try!

Tchoutchouka: Moroccan Roasted Pepper and Tomato Salad

Tchoutchouka Recipe

4 servings

2 medium green bell peppers
2 medium tomatoes, peeled and diced
3 tablespoons olive oil
3 garlic cloves, minced
Sea salt and freshly ground pepper
½ teaspoon ground cumin
¼ teaspoon ground paprika

Roast the peppers by charring them directly on the stove, turning them occasionally, until the skin is blackened and blistered all over about 10 minutes. Place the peppers in a paper bag and close it, for about 15 minutes, to allow the peppers to sweat and their skin to become softer. Peel the skin off the peppers using your fingers. Discard the stem and seeds. Finely dice the peppers. Set aside.

Place the tomatoes in a medium skillet with olive oil. Add the garlic and season the tomatoes with salt, pepper, cumin, and paprika. Cook the tomatoes until they become soft and turn into somewhat of a thick, chunky sauce, 10 to 15 minutes. Mix in the diced peppers and cook for another 2 to 3 minutes.

Serve with bread or crackers.

Tchoutchouka: Moroccan Roasted Pepper and Tomato Salad
Mellahs are Jewish quarters located in the old, walled part of most major Moroccan cities.
Tchoutchouka: Moroccan Roasted Pepper and Tomato Salad
Looking for an excuse to make chocolate truffles? Here is a couple. 1. Chocolate fixes
Tchoutchouka: Moroccan Roasted Pepper and Tomato Salad
God bless Memorial Day. Not only for the obvious reason but also for the many

The post Tchoutchouka: Moroccan Roasted Pepper and Tomato Salad appeared first on Dinners and Dreams.


source https://www.dinnersanddreams.net/tchoutchouka-moroccan-roasted-pepper-and-tomato-salad/

Chicken with Tomatoes, Honey and Sesame Seeds

Chicken with Tomatoes, Honey and Sesame Seeds

Mellahs are Jewish quarters located in the old, walled part of most major Moroccan cities. The first Mellah was established in Fes in the 15th century where a large Jewish community settled. Fes was the center of many Judeo-Islamic exchanges throughout the centuries. It is a culturally rich city partly because of these and other exchanges. Many Moroccan Jews from Fes have the last name El Fassi (the one from Fes). Many Muslims from Fes have the last name Cohen or Guessous (a variation of Kessous). Many of the dishes both communities enjoyed are practically one and the same, sometimes having a different name, sometimes simply a different pronunciation (Moroccan Jews pronounce the “s” like an “sh” as in “sheffa” instead of “seffa”), or a couple of letters different (as in “tchermela” for “chermoula”).

This chicken with tomatoes and honey is one that is common to both communities in Fes. It is made in other parts of the country as well but is primarily known as a Fassi dish. My rendition of it is with chicken, tomatoes, and honey cooked together instead of the tomatoes caramelized separately and topped on the chicken at serving.

Bon appĂ©tit! Bessaha! Bete’Avon!

Chicken with Tomatoes, Honey and Sesame Seeds

6 small servings

6 skinless chicken thighs
1 small onion, peeled and minced
2 garlic cloves, minced or pressed
2 tablespoons olive oil
2 tablespoons unsalted butter
Sea salt, to taste
½ teaspoon ground black pepper
½ teaspoon ground ginger
¼ teaspoon turmeric powder

3 large tomatoes, peeled and diced
3 tablespoons honey

3 tablespoons white sesame seeds, lightly toasted

Place the chicken, onion, garlic, olive oil, butter, salt, pepper, ginger, and turmeric (first 9 ingredients) in a medium pot over medium heat. Sauté until the onions are translucent, 5 to 7 minutes.

Add the tomatoes and honey, cover and cook until the chicken is cooked and the sauce reduced 40 to 45 minutes.

Plate the chicken, top it with sauce and sprinkle it with sesame seeds.

Serve with rice or bread.

Chicken with Tomatoes, Honey and Sesame Seeds
With a husband who doesn’t eat green peppers and a daughter who doesn’t eat anything
Chicken with Tomatoes, Honey and Sesame Seeds
Looking for an excuse to make chocolate truffles? Here is a couple. 1. Chocolate fixes
Chicken with Tomatoes, Honey and Sesame Seeds
God bless Memorial Day. Not only for the obvious reason but also for the many

The post Chicken with Tomatoes, Honey and Sesame Seeds appeared first on Dinners and Dreams.


source https://www.dinnersanddreams.net/chicken-with-tomatoes-honey-and-sesame-seeds/

Friday, 15 November 2019

Cream Cheese Chocolate Truffles

Cream Cheese Chocolate Truffles
Looking for an excuse to make chocolate truffles? Here is a couple.

1. Chocolate fixes all problems, especially when in truffle form.
2. Chocolate is a great way to say “I love you” to yourself.
3. Chocolate gives you sexier legs.
4. Chocolate improves your odds of winning the lottery.
5. Chocolate makes the world go round.

When challenged to make something that does all of this and more for Go Ahead Honey, it’s gluten-free, I had to make chocolate truffles.

Cream Cheese Chocolate Truffles

Cream Cheese Chocolate Truffles Recipe

Makes 16 truffles

8 ounces low-fat cream cheese, preferably at room temperature
1 teaspoon vanilla extract
1 tablespoon brewed coffee (or liqueur of choice), optional
10 ounces good-quality bittersweet chocolate
1/4 cup unsweetened cocoa powder or finely shredded coconut, for coating

In a large bowl, stir the cream cheese well until fluffy. Stir in the vanilla extract and coffee or liqueur. Melt the chocolate in the microwave and slowly add it to the cream cheese while stirring. Continue stirring until the white from the cheese is no longer visible and the mixture is uniformly brown.

Refrigerate for 1 1/2 to 2 hours.

Using a teaspoon, scoop out the chocolate and shape it into 1-inch balls.

Place the cocoa powder or shredded coconut in a shallow dish and roll the truffles in the coating.

Bon Appétit!

Note: Refrigerate leftovers. Allow them to warm up and soften a bit at room temperature before serving them.

Cream Cheese Chocolate Truffles
God bless Memorial Day. Not only for the obvious reason but also for the many
Cream Cheese Chocolate Truffles
Love the nuttiness and slight bitterness of buckwheat? Looking for a gluten-free bread for your
Cream Cheese Chocolate Truffles
How I love a slow-cooked tagine of chicken with preserved lemons and olives. I have

The post Cream Cheese Chocolate Truffles appeared first on Dinners and Dreams.


source https://www.dinnersanddreams.net/cream-cheese-chocolate-truffles/

Thursday, 14 November 2019

Strawberry Cobbler with Quinoa Topping (Gluten-Free)

Strawberry Cobbler with Quinoa Topping (Gluten-Free)

God bless Memorial Day. Not only for the obvious reason but also for the many things having the day off allowed me to do today. My hand-wash clothes pile—whose label clearly says “machine washable” but qualifies as too delicate for me—was continuously growing on the bathroom counter for the past two weeks. My car was becoming an embarrassment with its bric-a-brac of books, toys, jackets, barrettes, paper clips, handouts from workshops, etc. The clothes and the car were thoroughly washed and things are looking presentable and refreshingly uncluttered again. It was a soapy morning inside and outside the house.

All that activity gave me the hunger of a wolf. Thankfully I had my delicious strawberry cobbler/crumble/crisp to go to. I prepared it the day before and had a little more than half of it left in the refrigerator waiting to be reheated and enjoyed. And reheated and enjoyed it was by me.

This strawberry cobbler/crumble/crisp—no matter the name—is easy to make, healthfully sweetened with agave syrup and a delicious combination of juicy and crispy: oven-tender, succulent strawberries and lightly browned, crunchy quinoa and walnuts tied together with a just a soupçon of butter and vanilla.

Strawberry Cobbler with Quinoa Topping (Gluten-Free)

Gluten-free Strawberry Cobbler Recipe

8 to 10 servings

For the strawberries
5 cups strawberries, hulled and quartered
1 tablespoon corn starch
4 tablespoons agave syrup
1 teaspoon lime juice

For the quinoa topping
1 cup cooked quinoa
4 tablespoons agave syrup
1 tablespoon butter, melted
½ teaspoon vanilla extract
Pinch sea salt
¼ cup chopped walnuts, almonds or pistachios

Preheat the oven to 375 degrees Fahrenheit.

In a 9 to 10-inch round or 8-inch square baking dish, combine the strawberries, cornstarch, agave syrup, and lime juice. Toss gently to mix.

Remove any excess water from the quinoa. Add the agave syrup, melted butter, vanilla extract, sea salt, and walnuts. Stir to combine. Top the strawberries evenly with the quinoa mix. Bake the strawberry cobbler until the quinoa is crispy and golden brown, 35 to 45 minutes. Cool the cobbler for 10 minutes before serving.

Strawberry Cobbler with Quinoa Topping (Gluten-Free)
Love the nuttiness and slight bitterness of buckwheat? Looking for a gluten-free bread for your
Strawberry Cobbler with Quinoa Topping (Gluten-Free)
How I love a slow-cooked tagine of chicken with preserved lemons and olives. I have
Strawberry Cobbler with Quinoa Topping (Gluten-Free)
Among the lovers of almond meal, I am the most passionate. The first time I

The post Strawberry Cobbler with Quinoa Topping (Gluten-Free) appeared first on Dinners and Dreams.


source https://www.dinnersanddreams.net/strawberry-cobbler-with-quinoa-topping-gluten-free/

Wednesday, 13 November 2019

Gluten-free Buckwheat Flatbread

Gluten-free Buckwheat Flatbread

Love the nuttiness and slight bitterness of buckwheat? Looking for a gluten-free bread for your sandwiches, dips and morning toast? This recipe is for you.

I’m only about 80 to 90% gluten-free. Have you heard of such a thing? I’m sure there are some people out there who can relate to this. But, of course, the purists would insist there is no such thing as almost gluten-free; one either is or isn’t.

I have been baking gluten-free as much as possible, forgoing bread almost every day but I do give in to the occasional good sandwich or an irresistible slice of pie every once in a while.

I think that qualifies me as almost gluten-free.

Gluten-free Buckwheat Flatbread

Although my gluten strike has not been all that draconian, I have missed bread terribly. So I made this easy and quick flatbread which I’ve eaten as breakfast toast as well as a burger bun. I cut the already thin bread open into even thinner slices and spread some cream cheese and honey on it. The flavor was a mix of bitter nuts, fresh cream, and nectar. Enough said!

Gluten-free Buckwheat Flatbread Recipe

Makes 4 pieces of bread (about 6 inches in diameter)

1 (1/4-ounce) packet active dry yeast
2/3 cup warm water

1 cup buckwheat flour
1 ½ cups millet flour
½ teaspoon salt
1 teaspoon brown sugar
1 egg yolk

2 tablespoons olive oil

In a small bowl, dilute the active dry yeast in the warm water. In a medium mixing bowl, combine the flours, salt, and sugar. Add the diluted yeast and egg yolk to the flours. Gather the dough in your hands into a ball. If necessary, add a few tablespoons of warm water, one at a time.

On a lightly floured surface, divide the dough into four small balls and flatten them into discs, about 4 inches wide. Cover with plastic wrap and a towel and let rest 15 to 30 minutes.

Heat a medium cast-iron or non-stick skillet over medium heat for about 5 minutes.

Brush the dough discs with olive oil and flatten them more until they’re about 6 inches in diameter.

Transfer the bread, one at a time, to the skillet. Cook until browned and cooked, 2 to 3 minutes per side.

Gluten-free Buckwheat Flatbread
How I love a slow-cooked tagine of chicken with preserved lemons and olives. I have
Gluten-free Buckwheat Flatbread
Among the lovers of almond meal, I am the most passionate. The first time I
Gluten-free Buckwheat Flatbread
Waiiit…don’t throw away your leftover cranberry sauce. Recycle it! OK, I know you haven’t digested

The post Gluten-free Buckwheat Flatbread appeared first on Dinners and Dreams.


source https://www.dinnersanddreams.net/gluten-free-buckwheat-flatbread/

Tuesday, 12 November 2019

Chicken Tagine with Preserved Lemons and Olives

Chicken Tagine with Preserved Lemons and Olives

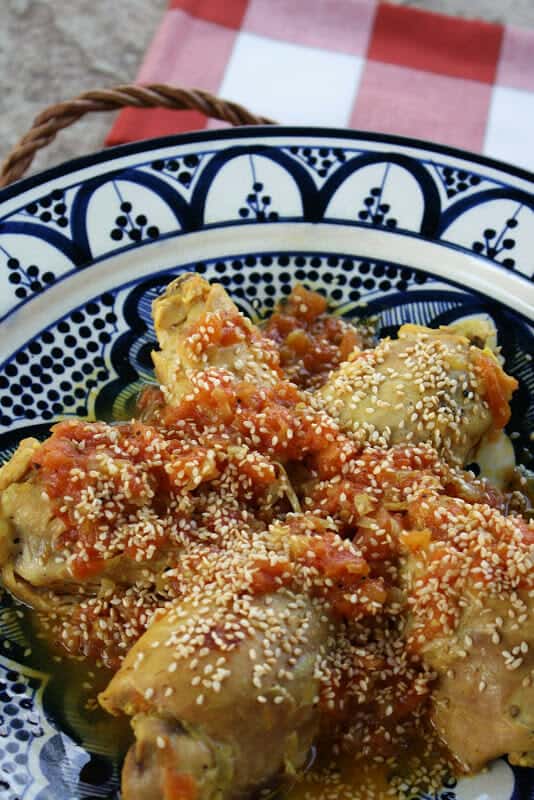
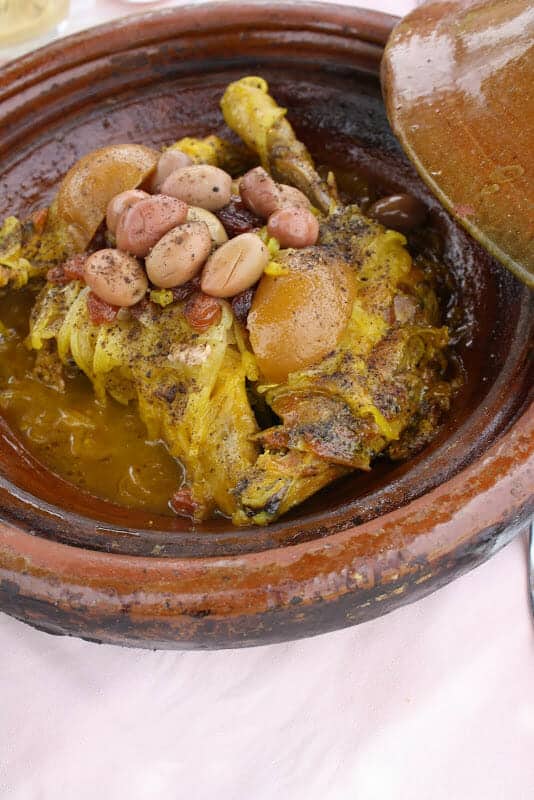
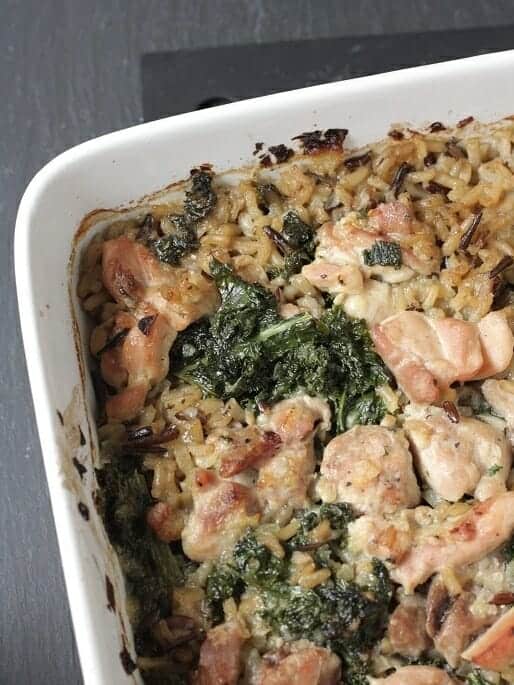
How I love a slow-cooked tagine of chicken with preserved lemons and olives. I have always loved the earthy flavors a tagine lends to anything cooked within its confines. For those unfamiliar, a tagine is a clay cooking vessel with a dome-shaped lid used in Morocco for hundreds of years. Nothing spells terroir better than a tagine and fresh local produce, in my opinion.

Even though, today, a tagine refers to any kind of Moroccan stew whether cooked in a tagine or not—and whether on a charcoal brazier or a stovetop—the authentic method, still religiously observed by villagers throughout Morocco, remains unsurpassed. Because of the time constraints of modern life, my mother, as well as most people I know, cook their tagine on a stovetop. The rustic method is nowadays a treat reserved for holidays and other special occasions.

Whenever possible, I make time for a tagine slowly cooked on a brazier. The preparation of a tagine is simple—all it takes is a little bit of planning ahead. I place all the ingredients together in my tagine at 2 or 3 o’clock in the afternoon and let the flavors slowly develop while that wonderful piece of art and history called a tagine permeates its unique flavor to the food over a small open flame for several hours. It’s ready just in time for dinner. I usually make it on a Sunday afternoon, when I’m enjoying the comforts of home and taking care of routinely things such as laundry, repainting my nails, straightening my hair, waxing, and the sort. You could do the same while watching football or doing some bricolage (DIY work) around the house. You will have something to look forward to. I know I will.

The next best utensil to use—if you don’t own a tagine—is a Dutch oven, followed by the mighty popular Crock-Pot. If you decide to buy a tagine; I would like to congratulate you on making one of the wisest culinary decisions of your life. Amazon has some great ones—Emile Henry’s is my number one pick.

Chicken Tagine with Preserved Lemons and Olives Recipe

The cooking time for this recipe is based on cooking the chicken in a pot on the stove over medium heat. If using a tagine, cut your chicken into 4 to 6 pieces, lower the heat and cook for 3 to 4 hours.

4 to 6 servings

4 tablespoons olive oil
3 garlic cloves, minced
1/2 teaspoon salt
1/2 teaspoon ground pepper
3 pinches saffron
1/4 teaspoon turmeric
1 teaspoon ground ginger
1 whole large chicken (3 to 4 pounds), cut into 4 to 6 pieces
1 large sweet onion, diced
2 1/2 cups water
2 tablespoons melted butter
1 tablespoon chopped parsley
1 tablespoon chopped cilantro
1 cup pitted green or red olives
1/2 cup raisins (optional)
1 preserved lemon without pulp, cut into strips

In a large bowl, combine the olive oil, garlic, salt, pepper, saffron, turmeric, and ginger. Rub all sides of the chicken with the mixture. Pour the remaining mixture into a large pot, add the onions, and place the chicken on top. Simmer over medium heat, turning occasionally, 12 to 15 minutes. Add the water and cook, covered, 45 to 50 minutes, turning the chicken halfway through the cooking.

Preheat the oven to 400 degrees Fahrenheit. Remove the chicken from the cooking pot and place it on a cookie sheet. Brush the chicken with melted butter and bake until golden brown, 8 to 12 minutes.

Continue cooking the sauce. Add the parsley, cilantro, olives, raisins, and preserved lemons and let cook until the sauce is reduced and thickened, 10 to 12 minutes.
Garnish the chicken with olives, preserved lemons, and sauce. Serve hot.

Chicken Tagine with Preserved Lemons and Olives
Among the lovers of almond meal, I am the most passionate. The first time I
Chicken Tagine with Preserved Lemons and Olives
Waiiit…don’t throw away your leftover cranberry sauce. Recycle it! OK, I know you haven’t digested
Chicken Tagine with Preserved Lemons and Olives
I’m fond of seasonal fruits and vegetables and am always anticipating their arrival. But…I also

The post Chicken Tagine with Preserved Lemons and Olives appeared first on Dinners and Dreams.


source https://www.dinnersanddreams.net/chicken-tagine-with-preserved-lemons-and-olives/

Monday, 11 November 2019

Almond and Sesame Cookies

Almond and Sesame Cookies

Among the lovers of almond meal, I am the most passionate. The first time I made these cookies with my mom as a child there was no such thing as an almond meal in our grocery store. I believe there still isn’t. We bought our almonds, blanched, peeled and ground them to a powder. The process was lengthy but well worth it. Now that I’m able to use almond meal, these cookies take me five to ten minutes to make. And I’m not the fastest person you’d ever meet.

When I saw these cookies in Nadji’s blog, saveurs et gourmandises, in their original cornes de gazelle shape, I was inspired. I felt a need, a necessity, an imminent life or death urgency to make them. So I made them, completely changing the shape but only slightly the ingredients. They were as good as those I had in my childhood, those I shared with my mother a million different ways.

Almond and Sesame Cookies

Gluten-Free Almond and Sesame Cookies Recipe

Makes 16 cookies

2 cups almond meal (available at WF)
1/2 teaspoon ground cinnamon
Pinch salt
2 tablespoons unsalted butter, melted (or coconut oil)
1/4 cup honey
2 teaspoons orange blossom water
1/2 cup white sesame seeds, lightly toasted

In a large bowl, combine the almond meal, cinnamon, and salt together. Stir in the butter, honey and orange blossom water. The mixture should be moist enough to shape between your hands. Form into small balls, the size of a walnut. Roll each almond ball into sesame seeds.

Serve with hot mint tea or spiced coffee.

Refrigerate leftovers.

Almond and Sesame Cookies
Waiiit…don’t throw away your leftover cranberry sauce. Recycle it! OK, I know you haven’t digested
Almond and Sesame Cookies
I’m fond of seasonal fruits and vegetables and am always anticipating their arrival. But…I also
Almond and Sesame Cookies
Along with skhina, tagine of meatballs with celery is a chabbat dish. Its origins take us

The post Almond and Sesame Cookies appeared first on Dinners and Dreams.


source https://www.dinnersanddreams.net/almond-and-sesame-cookies/

Friday, 8 November 2019

Cranberry Hummus Recipe

Cranberry hummus

Waiiit…don’t throw away your leftover cranberry sauce. Recycle it!

OK, I know you haven’t digested your Thanksgiving dinner yet, but you’re not done with Thanksgiving flavors yet. I haven’t digested mine yet either but I know that as soon as I have I will want more pumpkin, more cranberries, more pecans in my life. I know I will be having them many times many ways before the year is over.

So, if you have any cranberries or cranberry sauce left, please make this hummus. You’ve got to make it, for your own sake, please! Chances are you still have family over and you want a great dip to mingle around. Everybody loves hummus and has a great conversation at its presence. I know so. Imagine how pleased everybody will be to see yesterday’s cranberry sauce in the hummus. They’ll love you for that.

Now a bit of description, so listen up. This is not a traditional hummus, meaning it’s not made with hummus (chickpeas in Arabic). It is made with cannellini beans which give a smoother dip. The cranberry sauce adds a tart, almost lemony taste. The flavor is bright and redolent of half traditional hummus, half cranberry dessert. All in all, a fantastic dip!

Hummus Recipe

4 to 6 servings

1 garlic clove, peeled
1 (15-ounce) can cannellini beans, rinsed and drained (or 1.5 cups home cooked beans)
2 tablespoons fresh lemon juice
2 tablespoons tahini (sesame paste)
2 tablespoons extra virgin olive oil
½ cup cranberry sauce

In the bowl of a food processor, pulse the garlic until finely minced. Add the cannellini beans, lemon juice, tahini and olive oil. Purée until you obtain a smooth paste. Transfer to a serving bowl. Stir in the cranberry sauce until the dip becomes pink. Serve with pita, flatbread, chips or crudités.

Basic Cranberry Sauce

Yields ½ cup

1 cup fresh cranberries
½ cup orange juice
¼ cup water
2 tablespoons honey
¼ teaspoon grated orange zest

To make the cranberry sauce, combine all of the ingredients in a small saucepan. Simmer over low heat, stirring occasionally and pressing the cranberries down, until you get a thick sauce, 10 to 15 minutes.

The post Cranberry Hummus Recipe appeared first on Dinners and Dreams.


source https://www.dinnersanddreams.net/cranberry-hummus-recipe/

Thursday, 7 November 2019

Lemony Beef and Fennel Tagine

Lemony Beef and Fennel Tagine Recipe

I’m fond of seasonal fruits and vegetables and am always anticipating their arrival. But…I also love those perennial crops that are humbly available throughout the year yet don’t fail to make me excited in any season.

Fennel is one of those year-round vegetables that I take pleasure in cooking at any time of year, especially in the summer. Its crisp taste and very refreshing aroma are like a breeze on a hot day. Perfect for cooling down the palate or lightening an otherwise heavy dish.

I made fennel tagine a few weeks ago. I’m not sure how I kept it unblogged about for so long. But it is finally here. And you simply have to try it. This one is particularly light, lemony and perfect for summer.

Lemony Beef and Fennel Tagine

Beef Tagine with Fennel and Lemon Recipe

4 servings

Ingredients:

  • 1 pound stewing beef, cut into 4 pieces
  • 1 large yellow onion, minced
  • 1/4 cup olive oil
  • 1/2 teaspoon sea salt, or to taste
  • 1/2 teaspoon freshly ground pepper
  • 1 teaspoon ground ginger
  • 1/4 teaspoon crushed aniseeds, optional
  • 1/4 teaspoon ground turmeric
  • 2 ¾ (2.75) cups water
  • 1 large fennel bulb, cut into strips
  • 2 tablespoons chopped parsley
  • Juice of 1 large lime or lemon

Directions:

Step 1: Saute the beef and onions in olive oil over medium-high heat, turning the meat once, 5 to 7 minutes. Add the salt, pepper, ginger, anise, turmeric, and water.

Step 2: Lower the heat to medium and cover with a lid. Cook the stew until the meat is tender, 50 to 55 minutes.

Step 3: Add the fennel strips and cook them in the stew until crisp-tender, 10 to 12 minutes.

Step 4: Remove the pot from heat. Stir in the parsley and lime juice.

Step 5: Serve warm with fresh bread to dip in the sauce.

The post Lemony Beef and Fennel Tagine appeared first on Dinners and Dreams.


source https://www.dinnersanddreams.net/lemony-beef-and-fennel-tagine/

Wednesday, 6 November 2019

Meatballs with Celery and Saffron

Meatballs with Celery and Saffron

Along with skhina, tagine of meatballs with celery is a chabbat dish. Its origins take us to Tangiers, a city in northern Morocco which hosted some of the first Jewish settlers due to its proximity to Spain. Even though the number of Jews dwindled over the years, it still has many of their landmarks including various synagogues and cemeteries.

A Jewish last name once popular in the northern regions is Azencot. In fact, the neighborhood where I spent a great part of my childhood in my beloved city of origin, Oujda, is still named Azencot to this very day. Tangierian Judaism was immortalized by Eugène Delacroix who, during a trip to Tangiers, painted a Jewish bride in a painting titled MariĂ©e juive de Tanger, and a Jewish wedding in Noce juive au Maroc. Both paintings are displayed in the Louvre museum in Paris.

Meatballs with Celery Recipe

4 servings

1 pound ground beef
1/2 teaspoon salt
½ teaspoon ground black pepper
½ teaspoon ground ginger
½ teaspoon ground nutmeg
1 medium yellow onion, minced
12 sprigs parsley, finely chopped
1 generous pinch saffron threads
1/8 teaspoon turmeric powder
3 tablespoons olive oil
1 cup water
4-6 celery stalks, cut into 2- to 3-inch pieces
1 cup peas, optional
1 preserved lemon, quartered or ½ cup olives

Mix the ground beef with the salt, pepper, ginger, nutmeg, one tablespoon of the minced onion and one tablespoon of the chopped parsley. Reserve the rest of the onion and parsley for the sauce.

Shape the ground beef mixture into balls. Place the rest of the onion and parsley in a medium-large pot along with the saffron, turmeric and olive oil. Add the meatballs. Sauté the meatballs 5-7 minutes over medium heat, turning them once. Add the water and celery. Cover the pot and cook until the meatballs and celery are cooked, 25 minutes.

Serve topped with olives or preserved lemon.

The post Meatballs with Celery and Saffron appeared first on Dinners and Dreams.


source https://www.dinnersanddreams.net/meatballs-with-celery/

Chicken, Wild Rice & Kale Casserole

Chicken, Wild Rice & Kale Casserole Recipe

I love it when I can whip up a dinner with pantry staples that are neither planned for nor fancy. Okay, to be honest, I like fancypants ingredients but most of the time I like to simply open the pantry, grab what I find and cook it into something palatable. That’s what I do almost every day and things haven’t been turning too shabby.

Take for example this casserole. I already had onions, garlic, rice, and leftover kale. I made a short trip to the store and bought some chicken.

Things came about quite naturally as I sauteed the onion, garlic, kale, and chicken, combined them with rice and broth, and popped the pan into a hot oven! It was (almost) effortless and our hearty dinner may well become a weeknight go-to quickie.

CHICKEN, WILD RICE AND KALE CASSEROLE RECIPE

Prep Time: 10 MIN

Cook Time: 1 HOUR 15 MIN

Ingredients:

  • 1 ¼ cups wild rice blend (or brown rice)
  • 1 small onion
  • 1 large garlic clove
  • ¼ cup olive oil
  • 1 small bunch of kale, chopped
  • Salt and ground pepper, to taste
  • 1 pound boneless skinless chicken (breast or thigh), cut into bite-size
  • 2 3/4 cups low sodium chicken broth

Directions:

Step 1: Preheat the oven to 375 F. Place the oven rack in the middle.

Step 2: Place the rice in a deep 8×10 baking dish. Set aside.

Step 3: Grind the onion and garlic in a food processor or grate them using a box grater.

Step 4: Heat the olive oil in a large skillet over medium heat. Sauté the onion and garlic for 3 minutes.

Step 5: Add the chopped kale and sauté it until lightly wilted 5 minutes. Season with salt and pepper. Transfer to the baking dish.

Step 6: Season the chicken with salt and pepper and sauté (in the same pan used for the kale) until lightly golden all around, 5 minutes. Add the chicken to the rice and kale in the baking pan.

Step 7: Add the chicken broth. Cover tightly with heavy-duty aluminum foil and bake for 45 minutes (60 minutes for brown rice). Remove the foil and bake for an additional 20 minutes. Let cool a bit before serving.

The post Chicken, Wild Rice & Kale Casserole appeared first on Dinners and Dreams.


source https://www.dinnersanddreams.net/chicken-wild-rice-kale-casserole/

Monday, 4 November 2019

Coconut Flour Muffins with Raspberries (Gluten-Free)

Coconut Flour Muffins with Raspberries

The last time I made a video dates back to about a year ago when I auditioned for the Oprah Network. It was just me, my camcorder and my many technical mishaps in the kitchen.

John was working that day so I had to video type myself, pause frequently, delete and record again, delete and record again. The three minute-video took me over 6 hours to produce. It was hard labor.

I have finally started recovering from all the work involved and am thinking about making another video soon. Hopefully this summer.

This time, I will do it when John is home so I wouldn’t have to run back and forth like a rabbit in a cage between the camera and the cutting board.

It was a year ago also that I raved about how much I love coconut flour. Ever since I made coconut flour pineapple upside-down cake (a light version that’s not caramelized), I have been an addict, making the same recipe over and over, which if you’ve been reading this blog, you’d know doesn’t happen often.

I have adapted that recipe slightly to make it suitable for muffins. I studded the muffins with raspberries and they were simply perfect. Moist to perfection and sweetly smelling of coconut.

Coconut Flour Muffins with Raspberries (Gluten-Free)

Coconut Flour Muffins with Raspberries Recipe

Yields 9 muffins

Ingredients:

  • 4 eggs
  • 6 tablespoons coconut oil or unsalted butter, softened
  • 1/4 cup plus 2 tablespoons cow milk or coconut milk
  • ½ teaspoon vanilla extract
  • 2/3 cup brown sugar
  • ¾ cup coconut flour
  • ¼ teaspoon salt
  • ½ teaspoon baking powder
  • 6 ounces fresh raspberries

Directions:

Step 1: Preheat the oven to 350 degrees Fahrenheit. Line a muffin tin with paper or silicone cups.

Step 2: Using an electric mixer, mix the eggs, butter, milk, vanilla, and sugar until well combined. Add the coconut flour, salt and baking powder and mix again.

Step 3: Divide the batter among the cups. Top each muffin with 2-4 raspberries, pressing them in lightly. Bake until set, 18-20 minutes.

Let cool and enjoy with a cup of coffee.

The post Coconut Flour Muffins with Raspberries (Gluten-Free) appeared first on Dinners and Dreams.


source https://www.dinnersanddreams.net/coconut-flour-muffins-with-raspberries/

Sunday, 3 November 2019

Perfect Tomato Sauce

Nothing beats a good homemade tomato sauce. No, sir. No, ma’am. I know there are many recipes out there but this one is my favorite.

My mom is really my first favorite and this one somewhat stems from it and is, therefore, a favorite as well. A good tomato sauce can take any dish from average to fabulous.

It can make a world of difference in pasta, soups, casseroles, pizza, beans, marinades, fish, rice, dips, and much, much more. Well, you get the idea… it can be used in everything! — except, debatably, desserts. I hope you like this one; it is perfect.

PERFECT TOMATO SAUCE RECIPE

Yield: 2 1/2 CUPS

Prep Time: 5 MIN

Cook Time: 25 MIN

Ingredients:

  • 4 large ripe tomatoes (1.75 to 2 pounds)
  • 4 garlic cloves, minced
  • 2 bay leaves
  • 3 tablespoons olive oil
  • 1 tablespoon white vinegar
  • 1 tablespoon harissa or other hot sauce (optional)
  • 1 teaspoon honey
  • ½ teaspoon salt
  • ¼ teaspoon ground black pepper
  • ¼ cup of water
  • 3 tablespoons tomato paste

Directions:

Step 1: Halve the tomatoes and grate them using the large holes of a box grater into a medium saucepan. Alternatively, you could peel and puree them in a blender or food processor.

Step 2: Add the rest of the ingredients except the tomato paste. Bring to a gentle boil. Lower the heat to medium-low and simmer the sauce until it looks thicker, 20 minutes.

Step 3: Discard the bay leaves. Stir in the tomato paste and cook for an additional 2 minutes.

VoilĂ !

The post Perfect Tomato Sauce appeared first on Dinners and Dreams.


source https://www.dinnersanddreams.net/perfect-tomato-sauce/

Avocado Chocolate Pudding

Avocado Chocolate Pudding

We have been having some incredibly beautiful weather lately: Warm and sunny but not yet unbearably hot. I have been accordingly taking advantage of that by spending as much time as I can outdoors and by the pool. I hope the good weather lasts a while before our grueling Florida summer arrives.

In the kitchen arena, I have been feeling inspired. Inspired by chocolate, to be exact. I don’t know where my sudden obsession with chocolate is coming from but I’m just glad it’s here.

First, there was the chocolate pie I made for John’s birthday; then, today, there is this chocolate pudding:

The easiest and most nutritious I’ve ever had. It is so creamy and luscious it’s hard to believe the main ingredient is avocados. Try it for yourself and find out.

Avocado Chocolate Pudding Recipe

2 servings

Ingredients:

  • 2 small ripe avocados, peeled and pitted
  • 1/4 cup plus 1 tablespoon maple syrup
  • 1/4 cup unsweetened cocoa powder
  • 2 tablespoons coconut milk or half and half
  • 1 teaspoon vanilla extract

Directions:

Step 1: Process all of the ingredients in a food processor until creamy and shiny.

Step 2: Chill before serving. It tastes better after it’s been refrigerated a couple of hours.

The post Avocado Chocolate Pudding appeared first on Dinners and Dreams.


source https://www.dinnersanddreams.net/avocado-chocolate-pudding/

Pear Chocolate Amandine

Good thing I love blogging because it can be a lot of pressure. Pressure of time, creativity and pressure to always make new dishes. I have some favorite recipes on this blog and sometimes I just want to remake them but feel that I have to make something new for the sake of the blog.

But you know what, I always end up with a feeling of satisfaction after stepping out of my comfort zone and creating something new. Marriage, friendships, parenting, jobs and most things we’re passionate about in life all come with a certain degree of pressure, don’t they?

When I saw pears in the market the other day, all I wanted to do was remake this galette. After all, it was very tasty and many people who made it told me they loved it too.

I wanted to make my old favorite but also wanted something new to share with you. With limited resources of time and energy I had to make a choice and as always I went for the second option. That option was this decadent pear chocolate amandine.

I’m so glad I went for it.

PEAR CHOCOLATE TORTE RECIPE

Yield: 6 servings

Prep Time: 10 min

Cook Time: 20 MIN

Ingredients:

  • 3 ounces dark chocolate, coarsely chopped
  • 4 tablespoons unsalted butter
  • ¼ cup muscovado sugar
  • 3 eggs, preferably at room temp.
  • ¼ teaspoon almond extract
  • 1 cup almond meal
  • ¼ teaspoon baking powder
  • 2 medium Bosc pears, halved lengthwise, cored, and cut into 1/8-inch slices

For the glaze

  • 2 tablespoons warm honey

Directions:

Step 1: Butter an 8-inch non-stick tart pan. Place the baking rack in the middle of the oven. Preheat the oven to 350 degrees.

Step 2: Melt the chocolate and butter in a large glass bowl in the microwave for 1 ½ minute, at 30-second intervals.

Step 3: Briskly whisk in the sugar, eggs and almond extract.

Step 4: Whisk in the almond meal and baking powder until the batter is smooth.

Step 5: Transfer the batter into the prepared pan. Fan out the pear slices on top.

Step 6: Bake until set, for 20 minutes. Brush the pears with the warm honey glaze.

Step 7: Let cool.

Enjoy!!

The post Pear Chocolate Amandine appeared first on Dinners and Dreams.


source https://www.dinnersanddreams.net/pear-chocolate-amandine/

Espresso Mascarpone-Stuffed Dates

It all started with a craving for coffee combined with popular demand for a date recipe from both my husband and readers. I closed my eyes ...