Thursday, 31 October 2019

How to Toast Bread & Bagels Without a Toaster?

Maybe you do not have a large amount of counter space to keep appliances like toasters or maybe your toaster is old and does not work as it did in the past or maybe you just don’t want to spend $30 just yet.

But that does not mean you cannot enjoy the perfect grilled cheese sandwich or toast bread to go with the eggs. Thankfully, there are multiple ways of getting crispy, browned bread with the charry marks around even without a toaster. Here are 5 methods that you can use.

How to Toast Bread, Bagels Without Toaster

1. Use the Stove Top


The post How to Toast Bread & Bagels Without a Toaster? appeared first on Dinners and Dreams.


source https://www.dinnersanddreams.net/how-to-toast-bread-bagels-without-a-toaster/

Moroccan Jam Cookie Sandwiches

Typically cut into rounds, these biscuits à la confiture can also be shaped into stars, leaves or any design imaginable. Hearts for Valentine’s Day would be oh so pretty.

The cookies themselves are sheer buttery comfort, but when filled with jam, they’re elevated to pure bliss. I remember how I loved them as a child; they were part of every holiday. Children and grown-ups alike get so excited about this beloved classic.

MOROCCAN JAM COOKIE RECIPE

Yield: 1 dozen Sandwiches

Prep Time: 20 Min

Cook Time: 12 min

Ingredients:

  • 1 ¾ cups white whole wheat flour
  • ½ teaspoon baking powder
  • ¼ teaspoon salt
  • 7 tablespoons unsalted butter, softened
  • 1/3 cup sugar
  • 1 teaspoon vanilla extract
  • 4 egg yolks
  • Strawberry or raspberry jam for filling the cookies
  • Confectioner’s sugar for dusting (optional)

Directions:

Step 1: In a bowl, sift together the flour, baking soda, and salt. Set aside.

Step 2: In a mixer fitted with a paddle, beat together the butter, sugar, and vanilla until creamed. Add the egg yolks, one at a time. Beat. Add the dry ingredients and mix.

Step 3: Transfer the dough to a floured surface, knead briefly. Divide into 2 pieces and flatten each one into a disc. Wrap each disc in plastic and refrigerate for 20 minutes.

Step 4: Heat the oven to 325 degrees Fahrenheit. Line a cookie sheet with parchment paper.

Step 5: Roll 1 disc of dough at a time to 1/8-inch thickness. Using a cookie cutter, cut out the cookies and transfer them onto the parchment paper-lined pan, leaving 1 inch between cookies. Using a smaller cookie cutter cut out the centers of half of the cookies. Reroll scraps and repeat.

Step 6: Bake until golden, 12 to 15 minutes. Let cool. Then flip the bottom half the cookies over; top each one with 1 teaspoon of jam. Dust the top halves with confectioner’s sugar and place it on the bottom halves.

The post Moroccan Jam Cookie Sandwiches appeared first on Dinners and Dreams.


source https://www.dinnersanddreams.net/moroccan-jam-cookie-sandwiches/

Wednesday, 30 October 2019

Moroccan Mustard Chicken for The Boston Globe

Moroccan Mustard Chicken for The Boston Globe

I wrote this mustard chicken recipe for the food column in The Boston Globe. It is creamy, zesty and perfect for the upcoming winter months. It is quite a change from a traditional tagine but still delivers all those well-loved Moroccan flavors. I think you’ll enjoy it as much as I do.

Click here for the recipe.

The post Moroccan Mustard Chicken for The Boston Globe appeared first on Dinners and Dreams.


source https://www.dinnersanddreams.net/moroccan-mustard-chicken-for-the-boston-globe/

Tuesday, 29 October 2019

Gorgonzola and Pecan Stuffed Dates

Gorgonzola and Pecan Stuffed Dates recipe

I’ve been piling up on healthy snacks for all kinds of cravings that I might succumb to—dried apricots and cranberries for my sweet weak spot; sea salted almonds, sunflower seeds and cheeses for salty yearnings, and a little nibble for every flavor in between.

Sometimes, though, my cravings are multi-layered and multicolored with hues of sweet and salty, pillowy and crunchy, delicate and sharp flavors combined. That’s when I feel I have to get creative and combine all of my favorite ingredients in one recipe that will satisfy my every urge and need.

These dates are all of the above—sweet and gooey with a surprise of pungent Gorgonzola, wet-green-meadow fresh basil and masculine, crunchy pecans.

What’s even better about them is that they are healthful, nutritious and perfect for moments when you want it all yet want to feel good about it; when you want to let your nombrils inner child prevail without feeling guilty.

Gorgonzola and Pecan Stuffed Dates

Gorgonzola and Pecan Stuffed Dates Recipe

Makes 12 stuffed dates

Ingredients Needed:

  • 12 Medjool dates pitted
  • 4 ounces crumbled Gorgonzola or Blue cheese
  • 2 ounces whipped cream cheese
  • ¼ cup chopped pecans
  • 8 basil leaves, chopped (optional)

Directions:

Step 1: Delicately clean the dates with a damp paper towel.

Step 2: In a medium bowl, combine the Gorgonzola, whipped cream cheese, pecans, and basil leaves.

Step 3: Stuff each date with about a tablespoon of the mixture.

Step 4: Enjoy as an appetizer, mid-morning or mid-afternoon snack. Delicious!

The post Gorgonzola and Pecan Stuffed Dates appeared first on Dinners and Dreams.


source https://www.dinnersanddreams.net/gorgonzola-and-pecan-stuffed-dates/

Monday, 28 October 2019

Couscous Casserole

Couscous CasseroleWhat have you been up to? A lot of feedings and diaper changes around here. They say you have to feed and change a baby every two to three hours but I think it’s really more like every hour and a half. Sometimes it seems like that’s all I’m doing all day long.

“You know, you’ve done it before…”, said the nurse at the hospital checkout. “But I forgot…uh, it’s been a while!”, I replied. I really did forget so many things. It’s feeling like the first time again and I’m as clumsy as ever trying to handle a tiny, delicate baby without squeezing him too hard or breaking him.

But between feeding and changing him, I have been finding time to do things such as cooking, writing, exercising and light socializing. I’ve worked out a (forever changing) schedule of sorts so that my routine includes a little more than continuous mothering. It helps that James does sleep between sessions.

It was between feedings that I thought I’d revisit the kitchen for some cooking. I had enough Thanksgiving meat leftovers for about a week but nothing to go with them. The only problem is I hadn’t done any grocery shopping lately and had to just see what’s available in my pantry and work with it.

There were three boxes of whole-grain instant couscous on the middle shelf, a can of olives on the bottom shelf, aging carrot and celery sticks left from a holiday appetizer tray in the fridge, and plenty of condiments to make it all taste good.

Whatever I was going to make needed to be ready quickly so that I can be available every minute of James’s waking time. I’m truly soaking up every moment with him. Oh, if only life could be one long maternity leave…

And so the ingredients turned into a couscous casserole. It could very well have been stuffing or dressing to eat with a holiday dinner but, no matter, it also makes a wonderful side dish anytime—as well as a recipe to tuck into the back of my mind for next Thanksgiving.

COUSCOUS CASSEROLE RECIPE

Yield: 4 SERVINGS

Prep Time: 10 min

Cook Time: 30 MIN

Ingredients:

  • 1 cup finely diced carrots (about 2 medium carrots)
  • 1 cup finely diced celery
  • 2 tablespoons grated onion
  • 3 tablespoons olive oil
  • 2 teaspoons harissa or other hot sauce
  • ¼ teaspoon fine sea salt (or to taste)
  • ¼ teaspoon ground black pepper
  • 1/8 teaspoon turmeric powder
  • ½ cup sliced green olives
  • 1/8 cup capers
  • 1 ½ cups whole grain instant couscous
  • 2 cups vegetable broth

Directions:

Step 1: Preheat the oven to 350 degrees Fahrenheit.

Step 2: Place the carrots, celery, onion, olive oil, hot sauce, salt, pepper and turmeric powder in a medium sauté pan. Sauté over medium heat, stirring occasionally, 10 to 12 minutes. Stir in the olives and capers.

Step 3: Place the couscous in an 8-inch square pan. Add the vegetable broth. Add the vegetables. Toss to combine. Cover with aluminum foil and bake for 20 to 25 minutes.

Step 4: Enjoy warm with your choice of meat or by itself.

The post Couscous Casserole appeared first on Dinners and Dreams.


source https://www.dinnersanddreams.net/couscous-casserole/

Sunday, 27 October 2019

Spiced and Herbed Goat Cheese

Spiced and Herbed Goat Cheese

The time after Christmas right before the end of the year is usually one of the quietest I experience. Unlike summer or spring break when I tend to be very active and do a lot of traveling, this time of the year finds me enjoying the tranquility and uneventfulness of the seasonal vacation.

As I’m lying nonchalantly on the sofa, my eye half blinded by a poignant ray of sun, I’m pensively contemplating my unusually placid neighborhood through the window blinds.

It is amazingly pacific out there, especially for a time when the kids are out of school and you’d expect to see many of them streaking the sidewalks with their shiny scooters and devilish skateboards.

Maybe their Christmas presents this year were of the kind that keeps their body pinned to a sofa, eyes glued to a screen, and thumbs fidgeting in right and left, up and down motions.

It’s quiet inside the house too. After company left yesterday and the spirit of the holiday with all its hustle and bustle is starting to fade away and feel like a thing of the past, everything is getting back to normal. I have made quite a few dishes over the last couple of days that I’ll be sharing right here in this young, aspiring blog throughout this week.

I have leftovers to last me for days. I have time this week. Time to spend with family. Time to read a good book. Time to go out for a brisk walk on the (child-free) streets. Time to stop and smell the roses. This is the most wonderful time of the year!

Spiced and Herbed Goat Cheese

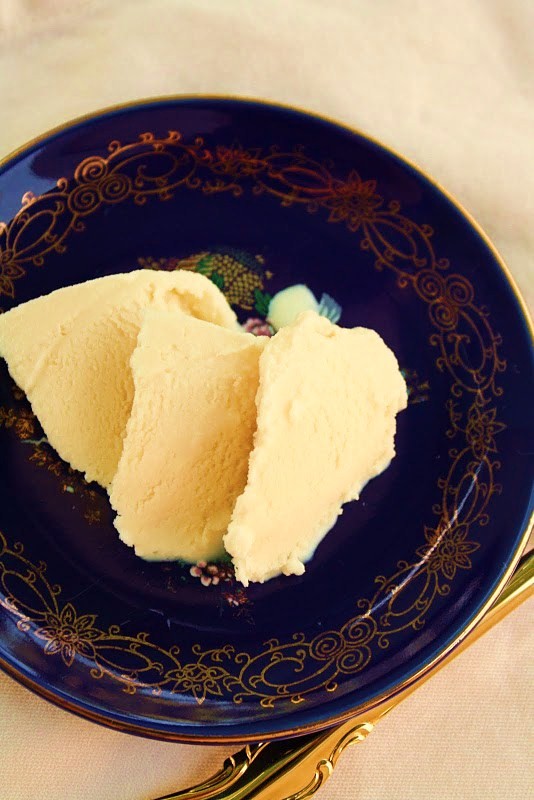
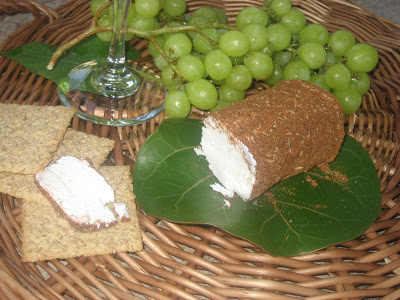
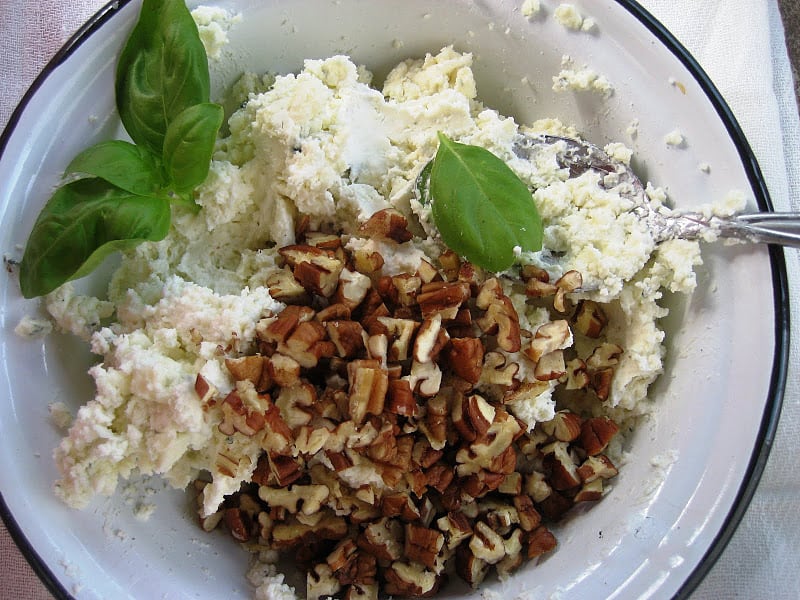
This is a recipe from my cookbook and the first of many appetizers I’ll be sharing this week. It is made with delicate goat cheese combined with bold spices and thyme. When I talked about having leftovers, this was certainly not one of them. It’s an appetizer I can’t make last very long. It is amazingly delicious!

Spiced and Herbed Goat Cheese

4 to 6 servings

Ingredients:

  • 1 teaspoon ground black pepper
  • 1 teaspoon ground cumin
  • 1 teaspoon ground coriander
  • 1 teaspoon ground cinnamon
  • 1/4 teaspoon ground nutmeg
  • 1/4 teaspoon ground cardamom
  • 1/8 teaspoon ground cloves
  • 1/8 teaspoon ground cayenne pepper
  • 1/2 teaspoon dried thyme
  • 5 ounces fresh goat cheese
  • Crackers or bread

Directions:

Step 1: Place the black pepper, cumin, coriander, cinnamon, nutmeg, cardamom, ground cloves, cayenne pepper, and thyme on a large plate. Stir with a spoon until well mixed. Spread into a thin layer.

Step 2: Shape the goat cheese into a log. Roll the log in the spice-herb mix until the cheese is completely covered.

Step 3: Wrap the goat cheese tightly in plastic wrap and refrigerate, 15 to 20 minutes.

Step 4: Serve with crackers or bread and fresh fruit. The cheese is also delicious drizzled with a little honey.

The post Spiced and Herbed Goat Cheese appeared first on Dinners and Dreams.


source https://www.dinnersanddreams.net/spiced-and-herbed-goat-cheese/

Saturday, 26 October 2019

Seafood and Chicken Paella

Seafood and Chicken Paella

As a child, I used to go to a seafood restaurant located in the port of Casablanca. It served the freshest, best-tasting seafood one could possibly have.

The décor was simple with solid burgundy tablecloths and walls sporadically decorated with fishing nets and wooden fish and seafood of all sorts. The food was always impeccable and the wait time accordingly extensive. One of their most delicious dishes was paella.

Seafood and Chicken Paella

I was lucky to eat there quite frequently as Casablanca was often in the middle of our travel itineraries and my family didn’t mind waiting at all if it meant we were going to enjoy a great meal.

One memory that comes back whenever I think of paella is the day I asked the waiter if I could have paella without rice. My mother still teases me about it to this day.

Quite ironically, my daughter asked me if she could have her grilled cheese sandwich sans the bread. My mother and I laughed heartily.

Seafood and Chicken Paella

This is my mother’s recipe for paella. I’ve cherished it for so long and today finally had the time to make it for the first time in months. It is a delicious all-in-one meal that makes a great weekend lunch or dinner with family, especially in this wonderful weather.

Seafood and Chicken Paella

Seafood and Chicken Paella

4 servings

Ingredients:

  • 1 medium yellow onion, minced
  • 2 garlic cloves, minced
  • ½ pound chicken breast, cubed
  • ¼ cup olive oil
  • Salt and freshly ground pepper
  • 1/8 teaspoon turmeric powder
  • 2 pinches saffron threads
  • ¼ cup of warm water
  • ½ cup tomato puree
  • 4 cups chicken broth
  • 4 sprigs parsley
  • ¼ cup diced yellow bell peppers or mini sweet peppers
  • ¼ cup diced orange ell peppers or mini sweet peppers
  • ¼ cup diced red bell peppers or mini sweet peppers
  • ½ cup peas
  • 1 ½ cups long grain parboiled rice
  • 1 dozen littleneck clams
  • ½ pound medium shrimp with tail, peeled and deveined
  • ½ pound squid, cut into ½-inch slices
  • 1 lemon, quartered
  • 2 tablespoons chopped parsley

Directions:

Step 1: In a 4-quart pot, over low-medium heat, sauté the onion, garlic, and chicken in olive oil until golden, 6 to 8 minutes. Season with salt, pepper and turmeric powder.

Step 2: Melt the saffron threads in the warm water and add it to the pot. Add the tomato purée, chicken broth, and parsley sprigs. Bring to a boil over medium-high heat.

Step 3:Lower the heat to low. Incorporate the yellow peppers, orange peppers, red peppers, peas, and rice. Add the clams, shrimp, and squid. Cover the pot with a lid and cook for 25 minutes.

Step 4:Preheat the oven to 350 degrees Fahrenheit.

Step 5: Discard the parsley. Transfer the contents of the pot into a baking dish, leaving out the excess sauce. Bake for 5 to10 minutes. Garnish with lemon wedges and parsley. Serve warm.

The post Seafood and Chicken Paella appeared first on Dinners and Dreams.


source https://www.dinnersanddreams.net/seafood-and-chicken-paella/

Friday, 25 October 2019

Gum Mastic Ice Cream

Gum Mastice Ice Cream

While the first batch of the mastic pudding I made a couple of days ago was baking in the oven, the second one was churning in the ice cream machine.

Even though mastic is so sticky, the ice cream is not as resinous as I thought it would be, it doesn’t hold on to the spoon like glue (I was hoping it would.) It has the texture of regular ice cream but with a very distinguishable flavor.

It tastes very aromatic, very Levantine. Its aroma is evocative of baklava shops, Turkish delight, Aleppo souks, and Moroccan weddings.

To make this ice cream, simply prepare mastic pudding and churn it in the ice cream machine instead of baking it. Transfer it to a lidded container and freeze it until set.

Gum Mastic Ice Cream

Gum Mastic Ice Cream

The post Gum Mastic Ice Cream appeared first on Dinners and Dreams.


source https://www.dinnersanddreams.net/gum-mastic-ice-cream/

Thursday, 24 October 2019

How to Make Preserved Garlic

How to Make Preserved Garlic

I preserve garlic and keep it in the refrigerator for weeks for those instances when I don’t have much time for chopping and mincing.

Nothing beats the strong taste of fresh garlic but preserved garlic, to me, is a close second. I can’t stand the funky taste and spongy texture of garlic that comes in a jar but this preserved garlic is different. The olive oil totally preserves the taste and freshness of the garlic.

When refrigerated, the garlic and olive oil turn into a solid butter-like substance that’s easy to spoon out, melts right onto a hot pan upon contact and comes in handy when making dinner.

Some grocery stores sell already peeled fresh garlic. That’s what I use to prepare garlic in advance. I prepare about half a pound of garlic at a time.

Preserved Garlic in Olive Oil Recipe

Ingredients:

  • Peeled garlic cloves
  • Juice of 1 lemon
  • Enough olive oil to cover the garlic

Directions:

Step 1: Process the garlic in a food processor until very finely minced.

Step 2: Transfer it to a jar, add the lemon juice and pour in enough olive oil to cover the garlic.

Step 3: Close the jar tightly and refrigerate for up to 3 weeks.

¼ teaspoon of prepared garlic is equivalent to 1 fresh garlic clove.

The post How to Make Preserved Garlic appeared first on Dinners and Dreams.


source https://www.dinnersanddreams.net/how-to-make-preserved-garlic/

Wednesday, 23 October 2019

10 Ways to Use Argan Oil

10 Ways to Use Argan Oil
Called liquid gold or golden oil because of its color as well as its treasured culinary, cosmetic and medicinal virtues—and possibly because of its expensive price—argan oil is produced exclusively in Morocco.
It is extracted from the kernels of the ancient and thorny argan trees in the south of Morocco. It has gained worldwide merit and appreciation in the past 20 to 30 years as researchers continue to unravel its marvels.
When I lived in Morocco, I enjoyed it occasionally served with an almond dip called Amlou (recipe in my book) but my earliest memory with it was at the age of seven when my mother used it to soothe my varicella (chickenpox).

These are some of the most common uses for Argan Oil:

1. Dips and Salads: It tastes delicious as a dressing for salads, vegetables, and dips either by itself or mixed with lemon juice or vinegar.
2. Tagines and Couscous: It adds a nutty flavor to tagines, stews, and couscous, imparting an aroma reminiscent of hazelnuts.
3. Hair and Nails: It moisturizes and gives luster to hair and nails and favors their growth and health thanks to its high keratin content.
4. Skin Moisturizer: Rich in vitamin E, omega 3 and omega 6 fatty acids, it is great for lasting skin hydration.
5. Massage: It makes the perfect massage oil because of its smooth texture, light, pleasant scent, and multiple skin benefits.
6. Anti-aging: It is a great antioxidant and prevents skin from wrinkling as well as diminishes the appearance of existing wrinkles.
7. Cicatrization:
It is a great cicatrizant and helps heal scars left from acne, burns, stretch marks, varicella, etc.
8. Stretch Marks: It is great for preventing and treating stretch marks, especially during pregnancy.
9. Acne and Rashes: It works wonders in treating eczema, acne and other forms of skin irritation because of its high content in vitamin E and its anti-inflammatory properties.
10. Cardiovascular Health: It is a heart-friendly oil that lowers cholesterol levels and prevents myocardial infarction.
The post 10 Ways to Use Argan Oil appeared first on Dinners and Dreams.

Tuesday, 22 October 2019

Quinoa patties

Quinoa patties
My lunches have been consisting of these quinoa patties lately and I can say I have been looking forward to lunch more than ever before.
Having extended my maternity leave for a few additional months, I have been exercising almost daily, and having these at the ready to enjoy right after workouts has been wonderful.
They reheat really well and are filled with nutrients and deliciously aromatic thanks to a fine amount of carrots, celery and onion tucked within. They are great as is but you can also enjoy them with a melted slice of cheese on top or include shredded cheese in the mixture for extra protein.
Quinoa patties
Quinoa’s texture is very sexy. It’s soft and pleasant to bite into but not mushy. What I love about quinoa patties is the crispy surface from pan frying. It adds a nice nutty, slightly charred taste that highlights the softer inside even more.
Quinoa patties

QUINOA PATTIES RECIPE

Yield: 8 PATTIES
Prep Time: 15 MIN
Cook Time: 10 MIN

Ingredients:

  • 1 cup uncooked quinoa, rinsed
  • 1 medium carrot, chopped
  • 1 celery stick, chopped
  • ½ medium onion
  • 3 tablespoons olive oil
  • Sea salt and freshly ground pepper
  • 1 tablespoon Dijon mustard
  • 2 large eggs, beaten
  • Canola oil, for pan frying

Directions:

Step 1: Place the quinoa with 2 cups water in a saucepan. Bring to a boil. Reduce the heat to low, cover and simmer for 15 minutes. Let cool completely.
Step 2: Meanwhile, chop the carrot, celery and onion finely in a mini food processor. Transfer to a frying pan. Add the olive oil and sweat the vegetables over medium heat, 3 to 4 minutes. Remove from heat and let cool.
Step 3: In a mixing bowl, combine the vegetables, cooked quinoa, salt, pepper, mustard and whipped eggs.
Step 4: Generously coat a large non-stick frying pan with oil and heat it over medium-high heat. Shape the quinoa mixture into 3-inch patties. Carefully and closely deposit the patties onto the hot pan.
Step 5: Cook the patties undisturbed, 3 to 4 minutes per side until their surface is brown and crispy. Use two spatulas to carefully turn them over. Proceed in two batches to avoid overcrowding the pan and making flipping the patties difficult.
The post Quinoa patties appeared first on Dinners and Dreams.

Saturday, 19 October 2019

Kale Tabbouleh

Kale Tabbouleh

Ingredients

8 cups chopped kale, ribs and stems removed
1 cup fresh mint leaves
1 medium firm tomato, diced
1 medium cucumber, peeled and diced
2/3 cup cooked quinoa or couscous (optional)
Sea salt and freshly ground pepper, to taste
2 tablespoons olive oil
Finely grated zest and juice of 1 large lime

Using a food processor, finely chop the kale and mint leaves. This may take four to five batches depending on the size of your processor bowl.

Transfer the chopped kale and mint to a large glass bowl. Add the diced tomatoes, cucumber and grated lime zest (and quinoa or couscous, if using). Season with salt and pepper. Toss to mix the ingredients.

In a small bowl, whisk together the lime juice and olive oil. Add to the tabbouleh and toss well.
Serve immediately or refrigerate for later consumption. Tabbouleh will stay fresh for up to five days.

Serves 4

The post Kale Tabbouleh appeared first on Dinners and Dreams.

Friday, 18 October 2019

Sweet & Spicy Chicken Wings

Hiya, folks! I made chicken wings last weekend. I always thought they were more trouble than they’re worth. Messy hands, messy face, messy table for so little meat…but that may be part of the charm.
I know some of you out there adore wings, and if you don’t, I have good news. This recipe works great for drumsticks too.
The marinade is wonderfully sweet and spicy but not overwhelmingly—perfect for everyday chicken. Whether you make it with wings or thighs, you will love it.

SWEET & SPICY CHICKEN WING RECIPE

Yield: 2 servings
Prep Time: 5 min
Cook Time: 30 min

Ingredients:

  • 8 large chicken wings or 6 small drumsticks (about 1.5 pounds)
  • 2 garlic cloves, minced
  • 3 tablespoons maple syrup
  • 2 tablespoons red wine vinegar
  • ¼ cup olive oil
  • 1 teaspoon ground cumin
  • ½ teaspoon ground coriander
  • ¼ teaspoon cayenne pepper
  • Fine sea salt and ground black pepper, to taste

Directions:

Step 1: Combine all the ingredients for the marinade in a non-reactive container. Cut a few incisions on the chicken to allow the marinade to penetrate. Marinate the chicken at room temperature, 2 to 4 hours.
Step 2: Preheat the oven to 400 degrees.
Step 3: Preheat a large pan over medium heat. Sear the chicken for 3 to 5 minutes per side until it appears caramelized. Use a griddled pan if you wish to have a griddled effect on your chicken.
Step 3: Place the chicken in a rimmed baking pan. Baste both sides of the chicken with the remaining marinade. Pour any leftover marinade on top of the chicken. Bake until the chicken is cooked through, 25 to 30 minutes.
The post Sweet & Spicy Chicken Wings appeared first on Dinners & Dreams.

Espresso Mascarpone-Stuffed Dates

It all started with a craving for coffee combined with popular demand for a date recipe from both my husband and readers. I closed my eyes ...